DESIGN-A-PATTERN XV
from Ileen's Needle Nook
(www.ileen.com)
written by
Mike and Ileen Levy (ileen@ileen.com)
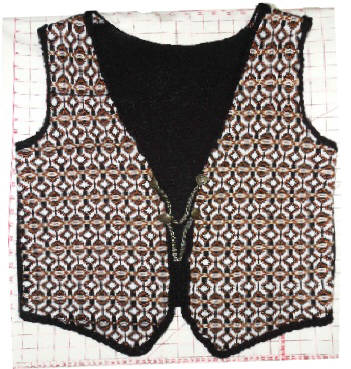
A sleeveless shaped cardigan
vest was used to illustrate Design-A-Pattern Volume #4. The back panel was knitted
in stockinette stitch while the two front panels were knitted with
a 3-color slip stitch design from Brother's Stitchworld Pattern Book #1. Front panels were connected with buttons and
chains.
Volume #4
Screen Descriptions
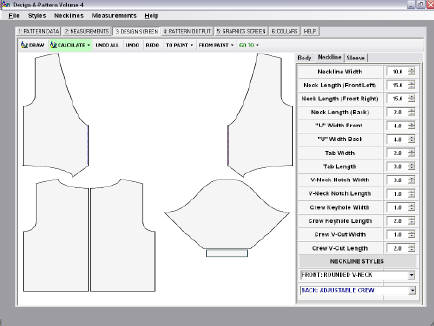
1) Information Screen Description
Information Screen selections were entered for a concave bottom
vest, capsleeve armhole, rounded-V front neckline and adjustable crew back
neckline. Two yarn
swatches were knitted since the solid-color back panel had different gauges
than the front panels with 3-color slip stitch design.
2) Measurements Screen Description
Starter sizing was selected to enter measurements for a Women's
size 34 (38" chest). The
printout lists all measurements used for this sweater example.
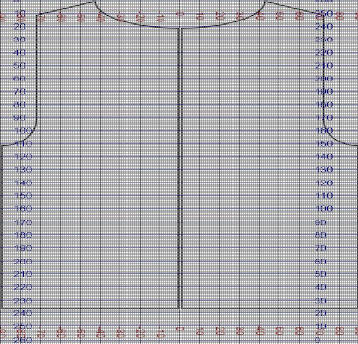
3) Design Screen Description
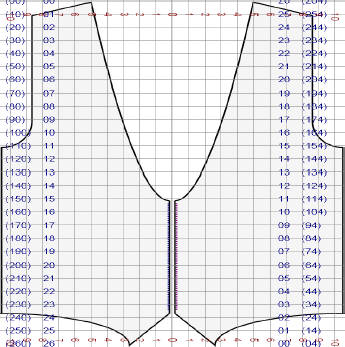
Garment panels are displayed to calculate rows and stitches
directly from black pixels on this screen. Panels are automatically redrawn when
measurement or styling options are changed.
4) Graphic and Text Printout Screen Descriptions
The graphics screen is used to create pictures of pattern panels
with various grid overlays while the Text Printout screen is used to create
pattern text directions. Outputs from
both screens can be copied, edited or printed.
For this example, front panels were calculated and printed separately
since they had different yarn gauges than the back panel..
ROW-BY-ROW PATTERN
DIRECTIONS
Design-A-Pattern row-by-row
directions read like a knitting machine showing right-side and left-side (-)
needles for each row when the number of in-work needles increase or
decrease. Straight knitting is used
between listed row numbers. Knitted
rows for body panels are also listed as an alert to start armhole or neckline
shaping.
Back
Panel Knitting Descriptions
Pattern Style : CONCAVE BOTTOM VEST
Armhole Style : CAPSLEEVE
Back Neckline : ADJUSTABLE CREW
Yarn Name
: Millor Trenzado
Yarn Gauges
: 10.0 Rows/Inch 8.5 Sts/Inch
MEASUREMENTS SUMMARY (Inches) PANEL
PANEL
__________MAIN BODY PANELS_________ ___ROWS__ __NEEDLES____
23.50 : Total Back Length 235 ---
15.00 : Waist Length 150
---
10.00 : Finished Armhole Depth 100 ---
42.00 : Finished Chest Circumference --- 178
42.00 : Finished Waist Circumference --- 178
42.00 : Finished Bottom Circumference --- 178
01.00 : Shoulder Taper 010
---
17.00 : Shoulder Width --- 144
_____________NECKLINES_____________ ___ROWS__ __NEEDLES__
10.00 : Neckline Width ---
084
02.00 : Back Neckline Depth 020
---
BACK PANEL ROW DIRECTIONS - BOTTOM-TO-TOP
_____ LEFT SIDE
____ ROW ____ RIGHT SIDE ____
Total Stop
Start NUMBER Start
Stop Total
===== ====
===== ====== =====
==== =====
89
-089 -001 < 001 > 001 089 89
START ARMHOLE
86
-086 -001 < 125 > 001 086 86
83
-083 -001 < 126 > 001 083 83
81
-081 -001 < 127 > 001 081 81
80
-080 -001 < 128 > 001 080 80
78
-078 -001 < 129 > 001 078 78
77
-077 -001 < 130 > 001 077 77
76
-076 -001 < 132 > 001 076 76
75
-075 -001 < 133 > 001 075 75
74
-074 -001 < 135 > 001 074 74
73
-073 -001 < 137 > 001 073 73
72
-072 -001 < 142 > 001
072 72
START NECKLINE
69
-072 -004 < 214 > 004 072 69
59
-072 -014 < 215 > 014 072 59
53
-072 -020 < 216 > 020 072 53
50
-072 -023 < 217 > 023 072
50
46
-072 -027 < 218 > 027 072 46
44
-072 -029 < 219 > 029 072 44
41
-072 -032 < 220 > 032 072 41
40
-072 -033 < 221 > 033 072 40
38
-072 -035 < 222 > 035 072
38
37
-072 -036 < 223 > 036 072 37
33
-070 -038 < 224 > 038 070 33
29
-067 -039 < 225 > 039 067 29
24
-063 -040 < 226 > 040 063 24
20
-060 -041 < 227 > 041 060 20
17
-057 -041 < 228 > 041 057 17
13
-054 -042 < 229 > 042 054 13
10
-051 -042 < 230 > 042 051 10
6
-047 -042 < 232 > 042 047 6
3
-044 -042 < 236 > 042 044 3
LAST ROW
Cast
on 178 sts (89 needles on each side of machine), and knit straight until
"armhole" shaping begins at row #125. Decrease outside needles on both sides as directed through row
#142 for armhole shaping. Knit straight
until neckline shaping begins at row #214.
At this point, put all the needles on the opposite side of the carriage
in hold position. Short-row shape both
the neckline and the shoulder slope at the same time. Take the shoulder
stitches off on ravel cord and waste yarn. Repeat for the other side of the back panel. Finish the neckline in the method of your
choice. The back panel is now
completed.
Front
Left Panel Knitting Description
Front Neckline: FRONT: ROUNDED V-NECK
Name of Yarn : Millor Trenzado & Twilley Goldfingering
Row Gauge : 10.50 Rows/Inch
Stitch Gauge : 9.50 Sts/Inch
MEASUREMENTS SUMMARY (Inches) PANEL PANEL
__________MAIN BODY PANELS_________ ___ROWS__
__NEEDLES__
26.00 : Total Front Panel Length 273 ---
15.00 : Waist Length 157 ---
10.00 : Finished Armhole Depth 105 ---
02.50 : Bottom Edge Length 026 ---
42.00 : Finished Chest Circumference --- 200
42.00 : Finished Waist Circumference --- 200
42.00 : Finished Bottom
Circumference --- 200
01.00 : Shoulder Taper 011 ---
17.00 : Shoulder Width ---
162
00.00 : Front Panel Overlap (Left) --- 000
00.00 : Front Panel Overlap (Right) --- 000
02.50 : Vest Bottom Inset --- 024
_____________NECKLINES_____________ ___ROWS__
__NEEDLES__
10.00 : Neckline Width --- 096
15.00 : Front Neckline Depth (Left) 158 ---
15.00 : Front Neckline Depth (Right) 158 ---
Determine
the widest part of the panel (100 sts).
Start with waste yarn and ravel cord to establish the base for vest
bottom shaping. Cast on 2 sts (needles
23 & 24), and knit 1 row. Cast on 1 stitch (needle 24), and knit 1
row. Continue casting on, and knit as
directed until row #26 to complete the bottom shaping. Knit straight until
neckline shaping begins at row #117.
Cast off inside needles as directed.
Begin casting off outside needles at row #158 for armhole shaping.
Continue shaping per row directions (armhole decreases are complete at
row #174 while neckline shaping
continues). Start short-row shaping for
the shoulder slope on row #264. When
the shoulder shaping is completed, remove these open stitches on ravel cord and
waste yarn.
FRONT
LEFT PANEL ROW DIRECTIONS (BOTTOM TO TOP)
ROW
LEFT RIGHT TOTAL
NUMBER NEEDLE
NEEDLE NEEDLES
====== ======
====== =======
001 23 24 2 START VEST BOTTOM SHAPING
002 22 24 3
003 21 24 4
004 20
25 6
006 19 26 8
007 18 27 10
008 16 27 12
009 16 28 13
010 14 30 17
012 12 33 22
013 11 35 25
015 10 37 28
016 9 40 32
017 8 42 35
018 7 45 39
019 6 49 44
020 5 53 49
022 3 63 61
024 2 70 69
025 1 80 80
026 1 100 100 END
VEST BOTTOM SHAPING
117 3 100 97 START NECKLINE SHAPING
118 5 100 95
119 6 100 94
120 7 100 93
121 8 100 92
123 9 100 91
125 10 100 90
127 11 100 89
128 12 100 88
130 13 100 87
134 14 100 86
135 15 100 85
137 16 100 84
140 17 100 83
143 18 100 82
145 19 100 81
148 20 100 80
150 21 100 79
155 22 100 78 START
ARMHOLE SHAPING
158 23 96 74
159 23 92 70
161 24 90 67
163 24 87 64
164 24 86 63
165 25 85 61
166 25 84 60
168 26 83 58
171 26 82 57
173 27 82 56
174 27 81 55
176 28 81 54
181 29 81 53
184 30 81 52
189 31 81 51
193 32 81 50
198 33 81 49
203 34 81 48
207 35 81 47
211 36 81 46
217 37 81 45
221 38 81 44
227 39 81 43
233 40 81 42
237 41 81 41
244 42 81 40
249 43 81 39
255 44 81 38
262 45 81 37 START SHOULDER TAPERING
264 45 78 34
265 45 75 31
266 45 71 27
267 45 67 23
268 46 64 19
269 46 60 15
271 46 57 12
272 46 53 8
273 46 50 5 LAST
ROW
FRONT RIGHT PANEL ROW
DIRECTIONS
Since both front panels are
symmetrical, knit the front right panel by simply inverting directions to the left
side of the knitting machine.
Assembly
and Trim Description
1.
Block
all panels to insure proper sizing.
2.
Seam
front and back panel shoulders together, using the method you prefer.
3.
Seam
the front and back sides together.
4.
Edging
was added to the vest using a design from Bonnie Triola's "100 Machine
Knit Trims and Edges". The trim
was knitted long enough for both front panels and back neckline before being
sewn to the garment.
5.
Vest
closures were made from inexpensive buttons and thin chain from a hardware
store. Buttonholes were not
needed. One chain end was attached to a
button and sewn to the left front panel.
The other end of the chain link was opened enough to slip it on and off
the button shank. The button was sewn
on the right panel, and the chain was connected.
Repeat
for the second set of buttons and chain.